LEADERS
BACK TO TABLE OF CONTENTS
MONOFILAMENT
FLUOROCARBON
LAUD OF THE RINGS
HOW LONG?
DRY FLY LEADERS
DRY FLY MONOFILAMENT LEADERS
FURLED LEADERS
MONO OR THREAD?
As we discovered in the chapter on fly lines, in order to work properly, the line has to have a certain amount of weight and mass. For it to have that weight and mass it has to be thick. Therefore it will not be inconspicuous in the water. We need to put some distance between the fly line and the fly if we are not going to spook the fish. To achieve this, a length of normal fishing line - known as monofilament or simply mono - is attached to the fly line and our fly is finally attached to the other end of that thin fishing line. This length of fishing line is called the leader. For dry fly aficionados I will mention that the next section is aimed at sub-surface fishing. Your special needs are described towards the end of this chapter. Let’s just remind ourselves how we attach the leader to the main fly line with the aid of a braided loop - here is Hywel Morgan’s video showing how this is done.

The leader material comes in two basic formats - normal monofilament and fluorocarbon. The two have different qualities, so both have their uses. Let’s look at both of them.
MONOFILAMENT
Monofilament line is the same fishing line used by other types of angling. It is cheap and readily available in spools from 50 yards up to 1000 yards. All lines are rated either by their breaking strength or their diameter - the breaking strength is usually more informative about what you can expect the line to deliver in the way of performance. There is also a line known as copolymer, or double strength, which is essentially a stronger version of monofilament.
 It would be nice if we could use a really strong leader to ensure that it does not break while we are fighting our fish - but the fish won't take the fly in the first place if it sees some thick piece of line trailing away from what it perceives as its dinner. So we have a catch 22 - too thin and we risk a break during the fight - too thick and the fish are scared off and there won't be any fight in the first place! Equally - too thin and we risk the weight of the fly breaking the line during the casting phase - too thick and the line will not let the fly move naturally through the water.
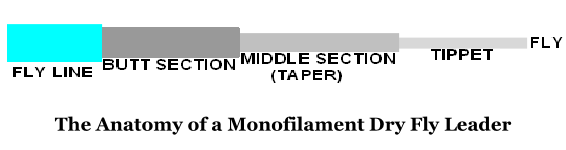
As if those challenges weren't enough, things can get even more complicated. Some manufacturers have created readymade leaders. “That’s a great idea for those too busy to make their own” - might be your initial reaction. But all is not necessarily what it seems. Let me explain. The idea is that the leader comes in a readymade package and is thickest near the fly line and gently tapers as it nears the fly. This tapering is meant to assist in making the leader straighten as it settles onto the water - the heaviest part landing first and progressively landing till the fly finally alights upon the water. The end where the fly is attached is called the tippet. So far, so good.
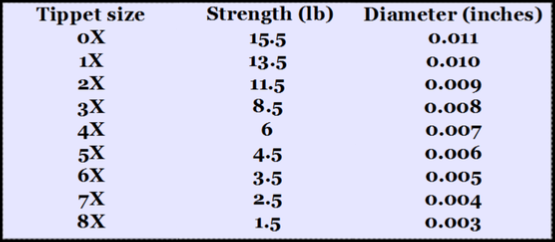
These pre-made leaders come in a variety of lengths and strengths to match the type of fishing you are doing. They are identified by a rating system that assigns an "X" number to the leader. Perversely, the larger the "X" the thinner the line! Below I have reproduced this table of tippet sizes with their associated strengths and line diameters - the strength relates to the line at the end of the tippet nearest to the fly, i.e. the weakest part. The information on the package will give you the overall length of the leader as well as its "X" rating.
Confused yet?!
Here’s a video to explain the set up of the leader using this pre-made system.
And this video also includes an introduction to the use of tippets.
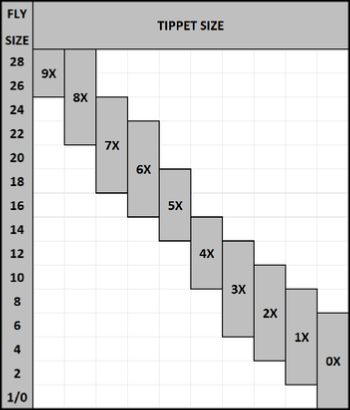
While many will like this idea of a pre-made leader, I believe that it does not afford the versatility that is required to meet the ever-changing circumstances while we are fishing. You pay your money and take your choice. Some experts go even further and advise that this sizing policy should also be applied to the size of hook that is used with the rig. Hooks vary so much in their shape and construction that it is difficult to see how their size can be determined by the size of line they are being attached to. Common sense should dictate the size of hook applicable to your fishing and the relevant set up in most cases anyway. Having said that, here are two rough rule of thumb tables for the size of fly to use with your rod/line weight and the relationship of tippet to fly size.

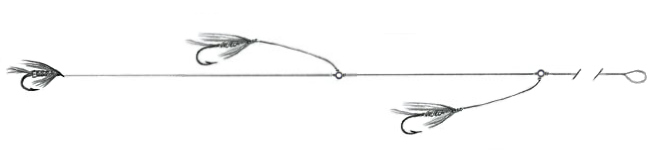
There is one other important reason why leaders come in a pre-assembled form. The art of fly fishing has developed to the point where you will frequently use more than one fly. In fact - apart from dry fly fishing - it is common practice to use three flies spaced down your leader. This naturally gives you a greater chance of hooking a fish - but there's a lot more to it than that. This three fly set up is often referred to as a "team of three" and this gives us some clue as to what's going on. Some flies are designed to be very visible and attract the fish's attention. Not surprisingly, these are called attractor flies and they are placed nearest to the fly line so they will be the first fly seen by the fish as the fly line is retrieved. Now that we have the fish’s attention we present it a little further down the leader with a fly that it is more likely to believe is its dinner, followed by another that might do the trick. So the flies are complementing each other and really are working as a team.
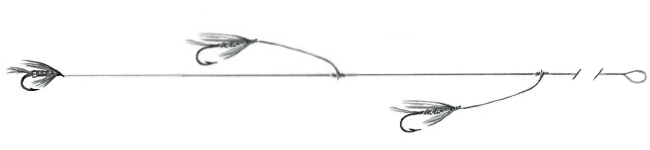
TEAM OF THREE
“Great” - I hear you say - but there's only one business end to the leader - only one place to tie the fly. Where do I put the other two flies? Now here's the sneaky part. Cunningly tied into these prepared leaders are two additional short pieces of line spaced several feet apart, just right for attaching another two flies! But stop and think. We have several pieces of line tied together and we have two additional short lengths of line hanging out to attach the other two flies. That sounds like a lot of bits of line and a whole lot of knots to tie it all together. That is why leaders come in pre-made packages. It saves you the time of putting it all together. Which is fine as long as you want the leader set up just the way it comes out of the package. What if you want more space between your flies? Or a longer front end to the leader before you get to the flies?
With experience you will want to put your own leaders together and for that you will need to learn the appropriate knots. Some people swear by barrel knots while others wouldn't leave home without a surgeon's knot - take a look in the Knots Section for more information on these and other knots. But before you start clicking I'll tell you one thing - I have never tied a leader set-up in all my years of fishing - I never needed to. I found another - much easier - way of solving the problem. More about that shortly.
If you decide to make up your own leaders you’ll need an easy way of working out various lengths and the following might help. In the comfort of your own home find a tape measure. Measure off one foot and hold the end of the tape between your finger and thumb and stretch it up your arm. Make a mental note of that spot on your arm. Do this again for two feet, three - which should take you across your chest - four and finally five feet - which should be close to both arms extended. I found that six feet was both arms extended and slightly behind me. This rough guide is invaluable when putting leaders together while standing on a bank or sitting in a boat, especially when fishing to a specific depth. Need a leader twelve feet long? That’s two big stretches across the chest. Remember to do it one piece at a time - from point fly to middle dropper, then from middle dropper to top dropper, then from top dropper to fly line. This could mean measuring four feet, five feet and then six feet - or whatever lengths you decide upon. This quick measuring aid will make everything a lot easier and more accurate.
FLUOROCARBON
 The other material used for making up leaders is called fluorocarbon and is a high-tech material with some interesting qualities. Firstly, for a given diameter fluorocarbon is much stronger than monofilament. This strength to thickness ratio cannot be overestimated. It means you can use a much thinner leader for the same resulting strength. And that can be the difference between a bag full of fish and a fruitless day. Fluorocarbon does not stretch as much under tension either, which means it is less likely to weaken under repeated use and will give a firmer strike to drive the hook home. Fluorocarbon is virtually impervious to water, whereas monofilament will actually absorb water, making it slightly weaker upon immersion.
Another interesting quality of fluorocarbon is its refractive index - a measure of how much it bends light. The closer the refractive index of a material is to 1 the closer it comes to being invisible. Fluorocarbon has a refractive index of around 1.4 while water has an index of 1.33. So fluorocarbon is close to having the same refractive index as water - and that’s what makes it seem to disappear in water - the light is being bent nearly the same amount through the water and the fluorocarbon. In comparison, monofilament has a refractive index of around 1.5 to 1.6 which makes it more visible in water. The difference may seem to be slight - but even a slight difference can make a big difference in how successful your fishing day is!
Which to use - monofilament or fluorocarbon? Fluorocarbon lines are much heavier than normal monofilaments, so they will tend to sink in the water rather than float on the natural surface tension. The density of monofilament is about 1.1 relative to water, the density of which - by definition - is 1.0. By comparison, the density of fluorocarbon is about 1.8. To put that into something we can understand, it takes mono about 40 seconds to sink through one foot of water, whereas the fluorocarbon will take only 15 seconds to sink the same amount. So the fluorocarbon sinks about three times faster than the monofilament.
 And the monofilament may not even be dense enough to break through the surface tension of the water in the first place. This may not sound terribly important until you see part of your monofilament leader still sitting on top of the water long after the fly line has sunk. This will have the effect of creating a bow in the line unless the problem is addressed - usually by putting a wetting agent on the monofilament leader. A good wetting agent is washing up liquid in a very diluted form. There are also several proprietary brands of liquid available. These are used by smearing a little between finger and thumb and running your leader through it. But even using a wetting agent will still leave the monofilament leader struggling to keep up with even the slowest of slow sink lines.
Of course, this is not a problem if you are using fluorocarbon line, as its high density will cause it to break the surface tension and sink rapidly. “Great” - I hear you say - “That's solved the problem and the leader will sink with the line”. But what about floating lines? With a floating line you want the whole rig to stay close to the surface. So, with a floating line use a monofilament leader which will float on the surface tension or sink, but much more slowly and keep you in closer contact with your dry flies. In all circumstances where you are using a sinking line I would advocate using a fluorocarbon leader. But there is always a catch! Fluorocarbon line is substantially more expensive than normal monofilament. You pay your money and take your choice!
You should always test a short length of your leader material before use, whether you are using monofilament or fluorocarbon. I was once in a fishing competition when a fine fish smashed my leader. I made up another leader and started fishing again, only to have exactly the same thing happen again. Losing the first two fish of the day is not a good way to start a fishing competition! I checked my reel of leader material and close examination showed that the whole reel was defective - even a small force caused it to break. I changed to a different reel of leader material and, luckily, I caught sufficient fish that day to win the competition anyway, but now I always remember to check a new spool of leader material before I start using it.
I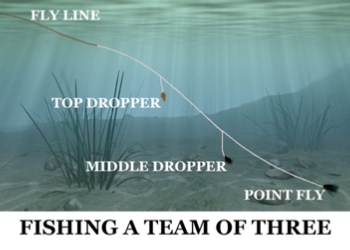 think it is well worthwhile spending the extra money for fluorocarbon line, but it can become very expensive making up three-fly rigs which may not last very long. Let's analyse this three fly set-up. We have a length of leader line attached to our main fly line, anything from a few feet to twenty feet long. Then we have our first tippet which is created from the tag end of the knot when tying in the next length of line. This tippet will be about six inches long. This is where we attach the fly nearest the rod tip - called the top dropper or bob fly. Then comes the next section of leader two to four feet long and the end of this creates the next tippet, again about six inches long. This is known as the middle dropper. Finally, another length of leader, perhaps another two to four feet or so takes us to the end of the rig. The fly tied at this end is called the point fly. This whole set-up can be anything from 10/12 feet up to thirty feet long. The length will depend upon the type of fishing you are attempting and we will cover that elsewhere.
Now, when you decide that the fly you are using is not as delicious to the trout as you first thought, you simply snip the fly off that dropper and tie on another. Great - but how many times can you do that before your dropper’s original length of six inches becomes too short to tie the fly on? What do you do then? Try and tie in another section of leader with the other dropper and rest of the leader still attached? Throw the whole rig away and start again? Remember, it has been made up with several knots, so you can't just tie in another piece without potentially weakening the rest of the set-up. What a waste, throwing the whole lot away because six inches of it has been used up. And that is why I have never tied up leaders and droppers - I could not justify the cost and the waste. I used to fish with just one fly until I found the perfect solution - which is so simple you wonder why no-one thought of it before!
LAUD OF THE RINGS
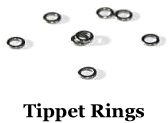 Readily available from most tackle shops and through the Internet are some very small silver rings, perfect for making up our own leader rigs. Instead of tying all our leaders and droppers together to form one long continuous length of line, we tie each part to one of these small silver rings. So, we have our first piece of line coming from the end of the fly line and to this we tie a silver ring. To that same ring we tie our first dropper. To that same silver ring we also attach the middle length of our leader - three pieces of line with three identical knots tied to the same ring. The middle length of leader terminates in a second silver ring, with a second dropper tied to it as well. Additionally we tie the final length of leader to that ring which then goes down to our point fly. And, hey presto, each piece of our leader is easily replaceable.
USING TIPPET RINGS
Used up all the middle dropper? Simply snip off the remnant and tie in another dropper onto its silver ring! Want to put more distance between the fly line and your top dropper? Cut out the top section of leader and replace it with a longer piece. All the rest of your leader remains untouched, reducing time, cost and frustration. Wait until you have to tie your knots in a gale and see how much easier this system is! The reason silver is used is because it is chemically inactive so will not react with any other metal in your fishing gear and is not affected by the water or anything else it contacts.
Silver rings come in several sizes so make sure you use a size that will pass through your rod rings and then you can simply wind the rig onto your reel when changing lines or at the end of the day. No more bird's nests to meet you when you next go fishing! It's also worth remembering that you can easily change lines by just cutting off your leader rig at the braided loop on the end of your fly line, installing your new fly line and then re-tying the leader to the new line's braided loop. Incidentally, you can find more about braided loops in the section on Knots.
There can be nothing more frustrating than trying to tie up a new leader rig in a strong wind - it has a mind of its own. Equally, the small silver rings can be a real challenge to tie up. I lost count of how many I dropped in the bottom of a boat or into the grass, never to be seen again. Solve both problems at once. Simply tie the dropper onto the ring before you go fishing and pop the dropper into a plastic wallet (don't use a paper envelope - it will only disintegrate). All silver rings need a dropper so you will have one attached to it ready for use. You really are saving time and patience by sorting it out before it becomes a problem.
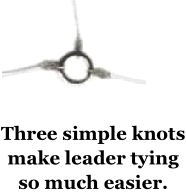 Another advantage - you can use exactly the same knot to tie up your leaders as you use to tie on your flies - a tucked clinch knot. This is one of the easiest and most secure knots. You'll find it in the Knots Section, along with that surgeons knot and barrel knot - but I never needed either of them! The original concept of a pre-made leader was so that a tapered leader could be used, made by a series of lines of lesser thickness creating a stepped effect in the leader. The theory is that the line will unfold in flight as it is cast with the thinnest line unfolding last and settling on the water. If you feel this is important to you then you can still create the same effect using the tippet rings. Simply use thicker leader material at the fly line end of your rig, stepping down in thickness as you proceed down toward the point of the set-up.
For years I would set up my leader for a day’s fishing and at the end of the day dismantle it all again, leaving the leader attached to the fly line to be wound onto the reel. So I would cut off the flies and then have to re-tie them on to the leader the next outing. One day I thought this seemed a waste of time at the start and end of each day. There must be a better way. I may be a little slow at times - but I usually get to a solution. The answer was a set of bath sponges! Just snip the entire leader set-up from the braided loop and wind it around the sponge, burying the hooks into the sponge to keep them safe. S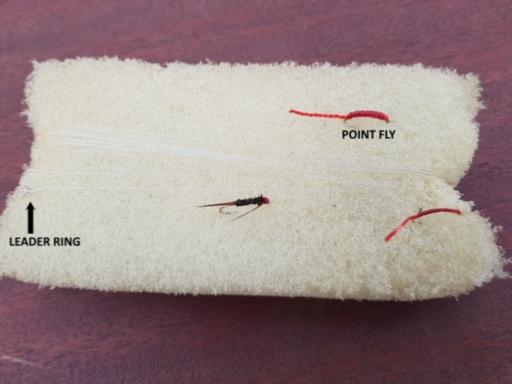 tart winding at the hookless end - the end that was tied to the braided loop. You can then trap this end by the subsequent turns to stop it unravelling. The other end finishes in your point fly which is buried in the sponge - on the opposite side of the line from the droppers so you’ll know next time which one to start with. So both ends are now secure. Next outing just unwind from the point fly and re-attach and you’re ready to fish. That’s got to be a lot quicker! I now keep half a dozen bath sponges in my fishing bag ready made up with differing leader lengths and flies so I can quickly choose the set up I want to use. A long leader set-up with buzzers for floating line fishing is illustrated - that’s an eighteen foot leader safely under control. You can also see one of my leader rings in use. A shorter leader system with nymphs for intermediate fishing is next, then a short leader set-up with a pair of boobies for sinking line fishing - you get the idea.
Sin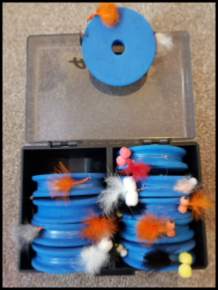 ce writing the piece above - about storing your leaders on bath sponges - one of the leading fly fishing equipment manufacturers have come up with an alternative solution. Of course, I had to try it out! It’s a clear top plastic box with eight hard foam reels. Like the sponge idea, you wind your leader on from the main line and and bury the hooks in the foam as you go. The point fly then acts as the final anchor. The picture on the right shows all my leaders neatly stowed and ready for use. This picture was taken late in the season, so there are a lot of booby set-ups ready for use. I think this is an excellent way of storing your leaders and I highly recommend it to you.
HOW LONG'S MY PIECE OF STRING?
How long should your leaders be? Well, that depends. When you get to the different fishing techniques you will see that some methods are very depth specific. For example, fishing a buzzer on a floating line depends on knowing the depth of the water and having a leader sufficiently long to allow the flies to hover just off the bottom. Equally, a booby will float up in the water as far as the leader will allow. But too long a leader will weigh the booby down so there is a limit to that effect. As a rule of thumb I think you should try and keep three or four feet between each fly. Any nearer and they are likely to get in the way of each other during casting and probably confuse the fish if it sees two potential meals competing for the same space. I like the idea of flies appearing to chase each other and I believe this can cause the fish to strike. The fish perceives a chased bug as obviously good enough to eat - or something else wouldn't be chasing it! I think this effect is best created with a distance of no more than three or four feet between the flies or else they will get lost in the underwater murk. The ideal flies to use with this system are leech type patterns that have lots of undulating movement in them.
To make this idea of a chased prey item work to best advantage I only use two flies when employing this method. This type of fishing is normally carried out with an intermediate line in ten or twelve feet of water. This makes the leader construction quite easy with just one dropper. We have four feet of line to the first dropper, another four feet between that dropper and the point fly, making a total leader length of just eight feet. This length of leader is easy to cast and control so is ideal for the beginner.
Contrast this to the hanging buzzers that could require a total leader length of thirty feet and you will see the difference! Remember, the buzzers need to hover just above the bottom of the lake, so with this set up the greater majority of the leader will be required to get the flies down to the fish. Most of this length will be taken up by the section of leader from the fly line to the top dropper. You may have just two or three feet between each fly. So the maths works out like this: point fly then three feet of leader, middle dropper then another three feet of leader before the top dropper. That's just six feet or so of our twenty or thirty foot leader that is actually being used to hold flies. That's a lot of leader to wave around in the air and I would suggest you start off very slowly and carefully when using this system.
You don't cast this rig a long way so you must be virtually over the deep water to use this technique to best effect. The practical solution to this is to use the long leader and floating line system from a boat. Use a fish finder or drop the anchor and measure how much rope pays out to assess the depth of water and hence the length of leader required. This is a slow way of fishing. It can take several minutes for the flies to get down through all that water and the retrieve has to be glacially slow to make sure they stay down there - any faster and you will simply pull the leader back up through the water column. One small thing to remember about fishing with a very long leader: if there is a strong wind it will set up undercurrents which will wash your long leader away, so it may not get down to the bottom without a weighted fly on the point. Alternatively, some people use a lead shot on the leader just above the top dropper to solve this problem.
You will notice that I have not addressed the question of what breaking strain leader to use. Normally, that will be determined by the fish you are hunting. The smaller the fish, the smaller the fly, the lighter the rig, the lighter the breaking strain. For those who go hunting the one kilo fish prevalent in most reservoirs and stocked lakes I would recommend a breaking strain of around 7-9 lb. That might sound like overkill but most of these waters will also stock grown on fish, sometimes into double figures and you want to give yourself a good chance of landing one of those if it comes along. With all sub-surface fishing the entire leader can be made up of the same breaking strain. Different thicknesses and breaking strains of leader only become important when dry fly fishing, where we need the entire leader to turn over smoothly and present the fly onto the surface of the water with the minimum of disturbance - more about this shortly.
The chalk stream aficionado will seek a much lighter set up for his tiny fly rig and a breaking strain of only 3 or 4 lb should suit his purposes. On the other hand, go to Alaska and be sure you are loaded for bear - so to speak. A breaking strain of 20 lb is not unusual when fishing for the monster king salmon. I once came across a Swiss gentleman in the Queen Charlotte Islands of Northern British Columbia who was fishing for 50 lb+ salmon with a 2 lb breaking strain leader. He was after a specific record of heaviest fish with lightest leader - but I wouldn't suggest you try that until you have some experience under your belt!
One last thought. You may have seen the tiny clips that are tied onto the end of your dropper and the fly is then clipped onto them. At first sight I thought this was a great idea, saving the time of tying on different flies and also saving on droppers. In use, however, they have an annoying habit of twisting around the shank of the fly and preventing the fly from being correctly presented in the water. This can become very frustrating if you have cast the fly, assiduously timed it down in the water, retrieved it at just the right pace and done everything else perfectly, only to find the fly is tangled with the clip and was never going to catch a thing. I give them a “thumbs down”.
DRY FLY LEADERS
Everything I have written in this chapter up to now is sufficient for most types of fly fishing. However, the concept of fishing with a single breaking strain leader is challenged when the dry fly fisherman enters the arena. Fishing a fine leader with small dry flies to skittish fish requires an extra degree of refinement not found in wet fly/nymph/buzzer/lure/streamer fishing, all of which are carried out sub-surface. With dry fly fishing the object of the exercise is to make the fly alight on the water with the minimum of splash. In order to achieve this, the theory of the “turnover” comes into play. Turnover is the act of the final length of leader straightening out completely as it settles on the water.
A simple demonstration of turnover - sit at a table and place your elbow on the table with your fingers touching your shoulder. Now slowly lower your arm onto the table and straighten your hand until your entire arm and hand are laying flat on the table. That is the idea of turnover - the unfolding of your fly line and leader in a continuous movement. It was discovered the best way to achieve this is to step down the thickness of the leader, each length straightening in turn until the last and finest length to which the fly is attached lands gently on the water.
There are two ways to approach this problem. You can use a series of monofilament lines, each thinner than the one before or you can use a furled leader, which is effectively a braid manufactured with a reduction in thickness as you approach the fly end of the leader. So the question is: which one to use - mono or braid? Let’s explore each one.
DRY FLY MONOFILAMENT LEADERS
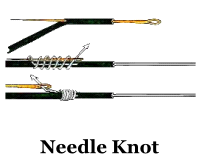 In order to differentiate the various lengths of line used, the leader is separated into three parts - the butt, the middle section and finally the tippet. The butt is the thickest part of the system and represents the transition from the main fly line to the leader. It is usually quite short, around 3 feet (1 metre) and this is attached to the main line by a needle knot. While a needle knot can be very difficult to execute, there is no doubt that the benefits outweigh the disadvantages. With a needle knot the butt section effectively appears out of the middle of the fly line as can be seen from the illustration and makes virtually no splash when landing on the water - unlike a loop connector. This short length is made up of a heavy monofilament around 22 - 25 lbs breaking strain.
The next section of the leader is a length of monofilament designed to take the next step down and this can be around 15 lbs breaking strain and can be around 1 or 2 yards (1 - 2 metres) in length. You can already see the transition from thicker to thinner lines. The actual lengths you use will depend upon prevailing conditions. You will need to use shorter set-ups in a strong headwind, for example. Use a four turn water knot or, even better, a figure of 8 knot to attach these two lines (see Section on Knots). One note of caution here: make sure the thickness of each line is proportionate. The butt section should be thicker than the middle section. It is possible to find 25 lb line that is thinner than 15 lb line and this should be avoided as the concept of turnover depends on each section having less mass (should be thinner) than the section before it. Indeed, it’s not only the mass that matters but also the stiffness of the various components - the closer you get to the fly the more supple the leader should be. Check the line diameters as well as their breaking strengths.
Next is a length of 8 lb monofilament of around 12 - 18 inches (30 - 50 cm), with another water/figure 8 knot. Finally the business end - the tippet is attached. This can be 1 - 1½ yards (1 - 1.5 metres) of 3 lb monofilament. These final two sections of 8 lb and 3 lb line can be changed if you want to use a slightly more robust set-up. Substitute 1 yard (1 metre) of 5 lb monofilament for these two lengths. Droppers are not usually used in dry fly fishing so this system is designed to get the one fly onto the water with the minimum of disturbance. Do not use loop connectors as these will cause a splash as they are picked off the water ready for the next cast. Readymade set-ups are available but most aficionados will want to make up their own systems to their own preferences.
One final word of advice on monofilament leaders: do not use fluorocarbon to make up a leader for dry fly fishing. As explained earlier in this chapter, fluorocarbon is much denser than normal monofilament and has a tendency to sink like a stone. That’s fine if you are fishing sub-surface but defeats the object if you want to fish a dry fly. From personal experience I can confirm that a leader made up with fluorocarbon likes nothing more than trying to drown your dry fly at every opportunity!
FURLED LEADERS
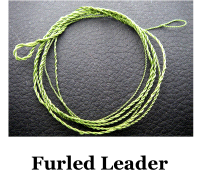 As you can see from the picture, the furled leader looks like a braid, but the important point to note is that one end is much thicker than the other as witnessed by the relative sizes of the two loops. It is this progressive reduction in thickness that gives us the turnover effect that we seek in dry fly fishing. While these leaders are normally shop purchased, it is possible to make them yourself and by examining the manufacturing process we can see just how they work. But first take a quick look at this video which will show you what a furled leader looks like in detail and demonstrates its declared advantage over monofilament.
I’ve used this video, not to advertise that particular manufacturer - there are several around - but to underline the difference a braided leader exhibits - its suppleness. It is this suppleness that is the great advantage of furled leaders. When sitting on the water it will follow any current or eddy and allow your fly a totally drag free ride. You can make your own from scratch.
Essentially it involves using a spool of Uni-thread 6/0 and looping it round a series of pegs, reducing the number of loops each time.
Some suggest using monofilament instead of thread but I think that defeats the object of the exercise - getting as supple a result as possible. The several strands of monofilament will be very stiff in comparison. And you definitely don’t want to try using fluorocarbon for the reason I explained earlier (fluorocarbon sinks) - unless you really do want your dry fly to be a wet fly! In a typical set-up there are four loops around the first peg, three around the second and two around the third, effectively stepping down the overall thickness each time. Each set of loops are linked together like a long chain. The cunning part is that you can use an electric hair braiding tool to spin everything together. Because of the way the pegs are placed there are no weak points in the leader.
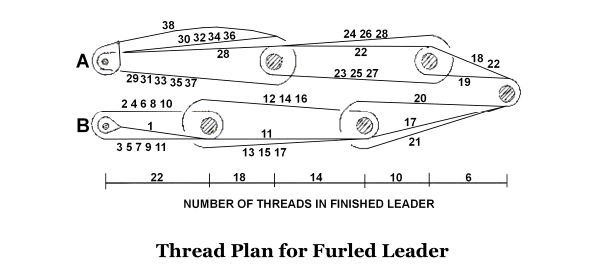
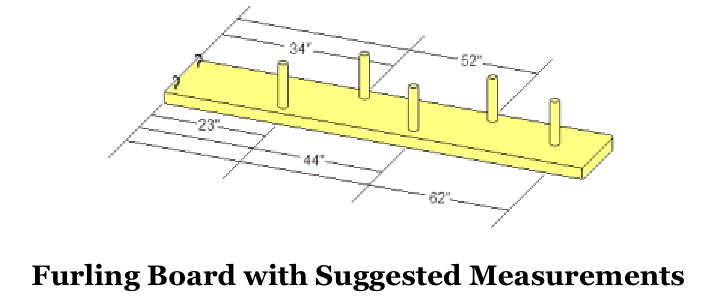
If you have time on your hands and a desire to do-it-yourself then you should give this a go. On the other hand if time is at a premium then a store bought furled leader is probably equally good. From the diagram below you can see that the single thread is wound repeatedly around the pegs starting at turn 1 and commencing through to the final turn at 38. The system in the diagram uses more pegs than Jim’s arrangement and creates a smoother stepping - at the cost of a lot more fiddling about! The suggested board size in the diagram will make a 5 foot leader. If you want a longer leader - you’ll need a longer board! The creation is then carefully removed from all the posts except the one at turn 22, kept under tension and twisted to bind all the turns together. The threads from hook A should be twisted separately from the threads from hook B and this separate twisting will cause the two sets of strands to twist together when a sufficient number of turns have been put into each side. Using a hair braider will put the same number of turns into each side. The creation is finished off by twisting both sides together - in the opposite direction to the first set of twists - until they start to over-twist, what is described as a pig’s tail. The end with turns 1 and 38 forms the butt end and a loop should be retained at the other end - turn 22 - for attaching the tippet.
If you refer back to the picture of the furled leader you will see the neat small loop at the fly end of the leader. This is called a Shorb loop. The tiny loop formed at peg 22 will be too small to use and should be turned into a Shorb loop or Perfection loop for use. This is done as shown in the following video.
One thing to bear in mind when attaching your tippet to your braided leader is the risk that the tippet will saw through the soft braid. This is especially true if you just use a blood or tucked blood knot for this attachment.
I came across this video which shows an alternative way of attaching the monofilament to the braid which spreads the load over a longer section of braid and so reduces the risk of this sawing action. I suspect this is known as an Albright knot...
Some manufacturers incorporate a small metal ring into the leader to overcome this problem but if you make your own or buy one that does not have this embellishment then it is worthwhile remembering this knot. When completed the furled leader should be rubbed gently with a Mucilin cloth which will ensure it floats. Mucilin is a fly floatant and can be purchased at all fishing stores. This braided leader replaces the butt and middle sections of the monofilament set-up but you will still need the tippet, which can be anything from as short as 1 ft (30 cm) to as long as the furled leader itself, depending on conditions and preference.
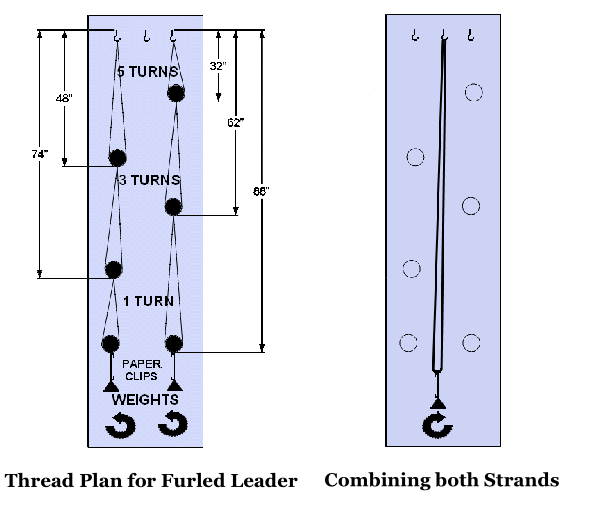
There is a second method for making your own furled leaders which is essentially the same as the one described above, but you start with two threads and in the final phase they are spun together to form one braid. I’ll give the details of that method too, as it gives a little more control having two separate strands to work with. The board is essentially the same as can be seen from the diagram below. The first thread is secured by tying a loop to the top left hook and then run around the left hand set of pegs, finally being attached to a weight by tying a loop in the thread and hooking it on with a paper clip. You must ensure that the thread passes through the previous loops to create a chain effect and not around the previous pegs. That means that after the fifth turn onto the first peg the thread is run back up to the hook and then straight down to the second peg, around that second peg and back up to the first peg - but not around it. The thread is passed through the loop of the first set of turns and then back down to the second peg, back up and through the first loop - and so on.
A second thread is then secured by tying a loop to the right hand hook and then run around the right hand set of pegs and then onto its weight by another loop and paper clip. This means that you have two threads running around their pegs and the two sides are kept separate. The total number of each set of threads must be less than the previous set or you won’t achieve the desired reduction in thickness. Finally each thread is finished with a loop and that loop and the lower set of loops are hooked onto a weight which hangs below the lowest peg. A ledger weight with a paper clip will suffice. As you can see from the left hand diagram, once the threads have been wound round the pegs they are then carefully removed from the pegs - but not the hook - and separately spun in a counter-clockwise direction. The direction doesn’t actually matter as long as both threads are spun in the same direction. The instructions state that you should continue spinning them until they have reduced in length by 10%. The weights will apply tension and avoid the threads kinking during this process. If they do kink, unwind them, apply more weight and start again.
Both threads are then carefully transferred to the centre peg and combined onto one weight using the loops that you originally made. The two threads are then spun together in the opposite direction to the way they were spun before. You can use more pegs and work out a different number of threads to suit your own needs. Some prefer to use a different thread other than the Uni-thread I mentioned previously and a thinner thread will produce a finer leader.
It is perfectly possible to make a furled leader out of monofilament, using just one length of mono and twisting it to form a two step leader. This video demonstrates this method.
The question of line memory may be a problem with this set-up, but nothing a good stretch before use should not solve. The downside is that there is only one step, although it may be possible to spin the line into three sections but each section will always be twice the thickness of the next section, so there are some drawbacks and limitations. Remember, the tippet is attached to this leader so you do have some control of overall length. It certainly seems like a quick alternative to the other furled leader method. You could say that this method is half-way between the other techniques described in that it uses a spun line but uses monofilament as opposed to a thread. Remember - don’t try this with fluorocarbon unless you decide to change to wet fly fishing!
MONOFILAMENT OR THREAD?
So we come to the crunch question - which to use? Thread furled leader or stepped monofilament? Here are a few comments I’ve picked up from some fly fishing forums about furled leaders, how they are used and the results they achieve.
“Presentation. I really can only speak to thread furled leaders, since that is what I use for almost all of my trout fishing on freestone streams in the American West. Thread leaders are probably the most supple thing in fly fishing. Try holding a piece of 5X (6 lb) tippet straight up. Some length of it will stand vertically until it is long enough to bend it over. Try holding a furled thread leader up straight. It can’t be done. That translates, on the water, to a leader that absorbs all the little currents between the end of the fly line and the tippet. That enhances the prospects of a perfect drift.”
***
“Furled leaders turn over flies quite nicely. The thread versions do have limitations on how nicely they will turn over larger flies, but they will turn them over and put them in position to begin a perfect drift. They excel at landing flies softly, from very small dries to very large dries that will often just flutter down onto the surface of the water.”
***
“The durability - even with thread leaders - is very good. I can use a thread furled leader for many, many outings before it will start to show any wear. Since there is a tip ring, adding fresh or longer or a different size tippet is a matter of a clinch knot at the tip end of the furled leader with the butt end of the tippet. Wind knots, which are pretty rare with furled leaders, do not weaken the leader - if you get to them soon enough, you can unknot them, and if not, just tighten them up and keep on fishing!”
***
“I find furled leaders very flexible - not in the sense of suppleness, but in the sense of use. I can use the same exact leader on rod weights 3 through 7, with tippets from 6X (3½lb) up to 2X (11½lb) - the range I use - and dry flies from size 20 to size 2. The presentations will vary somewhat, but when all is said and done, the fly is on the water with a great drift. I can use the same leader for dry / dropper set ups, and for straight nymphing, although there are better options for nymphing.”
***
“My preference is for the leader to submerge, not float. A minority of furled leader users share this preference. All I can say is - try it. A submerged thread furled leader will not sink even a small dry fly. I am not certain of this observation, but I do think that submerged leaders enhance hooking up, at least in some situations. (There are ways to make a thread leader float - if that is the way you want to fish it.)”
***
“I use a furled leader roughly the length of my rod. For my 7'6" 3 wt, I use a 6' leader and on my 9' 6wt, I use a 9' leader. It is hands down the best thing for me since sliced bread. I get so many less tangles with it for some reason. I usually attach 2-5' of tippet, depending on where and how I’m fishing on the day. The tippet is matched to the size of the fly by the usual ‘divide by 4’ (i.e. size 16 fly goes onto 4x tippet).”
***
“One furled leader lasted me all of last season and so far is going strong this season with no wear. I use Danville 210 Flymaster Plus fly tying thread for my furled leader. I have fished with a leader made from Uni-thread and it seemed to me that the leader wanted to actually sink rather than just submerge and that it did sink the fly. I tried a fluorocarbon leader for dry fly fishing, and it definitely wants to sink my dry flies, even the larger ones, on longer drifts. It’s okay for short dry fly drifts, but I built it for nymphing, and it does just fine in that application.”
***
“A friend of mine down in SE Idaho fished a back country cutthroat stream several years ago. He told me about having 25 fish hit the fly, and he only hooked and landed five of them. When I asked, he told me he was using a standard mono 4 X leader. I suggested he try again with the thread furled leader I had given him. A few days later, he called to tell me about his return trip - using the thread furled leader, he had 25 cutthroats hit the fly and he hooked and landed twenty of them.
My take on this is that with the slack in the thread leader has some give to it, so you can pull the trigger quicker with a thread leader and not move the fly as quickly, giving the trout more time to actually take the hook. The other thing regarding hook ups that occurred to me several days ago is that with the submerged furled leader and tippet, when you do pull the trigger, the fly is going to move down into the strike, not up or out and away from it.”
***
“You can use shorter, heavier tippets with a furled leader. I think most people have to use longer, finer tippets to make up for the butt and mid sections of a standard mono leader. All that relatively stiff mono in the butt and mid sections wants to "steer" the tippet and the fly on the water, leading to presentation / drift issues which can be solved by really long, fine tippets, to some extent, anyway. BUT the thread furled leaders do not have any tendency to "steer" the tippet and fly - in fact, just the opposite is true. The leader is absorbing currents and helping the tippet, even a heavier, shorter one give the fly a good, drag-free ride.”
***
You now have to decide which method you prefer - they all work - and there is a never-ending debate in the fly fishing forums I visit as to which one is the “right” one!
